December 27, 2011

How to get CaiCE Project Data into Civil 3D

First of all, I had an client who wanted to get some Survey data, DTM models and Cross-Section data from CaiCE into Civil 3D......Nooooo Problem!  Solution - CAiCE Translator Extension for AutoCAD Civil 3D 2012. 

The CAiCE Translator Extension for AutoCAD Civil 3D 2012 is an application that converts data from CAiCE projects into Civil 3D. Project data including survey data, points and chains, horizontal and vertical alignments, surfaces and cross sections can be selected and imported into the current Civil 3D drawing file. The extension does not require CAiCE to be installed!

Under the Toolbox......


 Survey Points and Data


 DTM Options.......

WOW! Presto! Look in your Toolspace................

http://usa.autodesk.com/adsk/servlet/ps/dl/item?siteID=123112&id=17461535&linkID=9240698

Kenneth L. Driscol

December 23, 2011

Express Tools for the 21st century - it's all about the Apps

Remember the good old days when we tricked out our AutoCAD by


  • adding LSP routines embedded in toolbar buttons

  • building menus with our favorite "Express Tools"

  • customizing our digitizers (pucks) with commonly used commands

  • loading up the old "Screen Menu" with our favorite macros

Aside from merging in some popular AUGI wish list requests into future builds of AutoCAD (obsoleting many of these tools or replacing them with superior functionality), Autodesk is now providing direct access to "apps" within the AutoCAD 2012 interface.


Called "Autodesk Exchange Apps", it's an inventive and modern approach to allowing us commoners to participate in making AutoCAD (and other AutoCAD based products in the Autodesk family) more customized and productive. While many of the tools are free, others cost anywhere from 99 cents up to $500. The tools are categorized for General, AEC and Manufacturing applications, and are searchable with keywords to match specific needs. And to make the acquisition process nice and easy, once selecting an app, if it's not free, a PayPal window will appear letting you enter your PayPal or credit card information to purchase. Please note that most apps are built for use in 2012 versions of Autodesk software, so if you're not current, you can't access the "Autodesk Exchange" or run the programs listed.


Grading in the Daylight


Daylight Rounding; try it, you might like it! Old school engineers and drafters still live in a world when a set of plans is a work of art and should reflect the real world. However, in the modern computing world, when finite math reaches a number, the computing stops. A great example of this is how the contours look when you are creating a corridor surface.

Contours are a major player in the older practice of hand drafting. Contours are flowing objects with few hard edges and angles in the real world. Yet when we calculate a TIN intersection, the contour will just stop and make an abrupt turn where that intersection is computed without any thought to what the end result will look like. I hear this question a lot from users: “How do I make my contours “tie in” with corridor surfaces?” By “tie-in,” they mean make the swooping arcs and look like they eventually will in real life. If you follow the link below, you’ll see an example of what old school engineers don’t want to see, how to fix it, and what the end result is.

In the image above you can see what happens when the corridor daylight subassembly calculates the intersection with the TIN and reaches true daylight: You’ll notice that the proposed contours (green and magenta) tie into the existing contours (gray) at a very harsh angle. This is typically not desirable to some engineers. Luckily, we can fake this in by setting a few parameters in the daylight subassembly. You’ll notice in the image below that I have set some rounding options in my subassembly parameters. I want a circular rounding, with a radial rounding, using a 200’ radius, and a tessellation factor of 10 (the highest factor.) And here are the results of these settings: You will notice that the contours are more “swoopy” (a term used by a not-so-old-school engineer I once worked with who actually preferred angular contours) and they tie in better. They really look more like they will in the real world once the project is built.You can play with the numbers and the options to get results that you want – the tessellation factor gives a more “rounded” look, and increasing the radius gives a more pronounced rounded tie-in. You can also experiment with the differences between parabolic and circular......
Kenneth Driscol

Pipe Systems Creation Methods

With the release of RMEP 2012, the workflow for creating Pipe Systems has taken on two different processes. The same is true for the HVAC systems as well, but we will be focusing on the Pipe Systems. The original process took us through selecting a fixture, then Create/Edit/Add to the system. The 2012 new process lets us create by duplication of the existing Pipe Systems and renaming them to the name we want. I will refer to these two methods as: 1) Create systems through selection –and- 2) Create systems through duplication. In my examples below I will be working with the Domestic Cold Water System specifically, but the process is the same for the other Pipe Systems as well.


The picture above shows the first method, Systems by Selection. The two restroom layouts are on separate Domestic Cold Water system names: DCW1 for the first floor and DCW2 for the second floor. The two system names are listed separately in the Flow Schedule and are ‘child systems’ of the Domestic Cold Water within the System Browser.

December 21, 2011

eTransmit for AutoCAD

Ok, so I saw Pete write a blog about eTransmit for Revit. As an old AutoCAD user, I felt the need to write about eTransmit for AutoCAD; the original eTransmit. And before that, Pack-n-Go.

I want to write about a feature few people use but is still very POWERFUL. You should feel and hear a deep dark voice as you read the word POWERFUL.

You can use eTransmit to not only automatically compress all your AutoCAD drawings into a .zip file or a self executible .exe file, BUT AT THE SAME TIME you can use e-Transmit to AUTOMATICALLY save your AutoCAD drawings to an older DWG version within the .zip or .exe file. Your orginal DWG files on your computer or on your server are not saved back to an older version, only the copies made part of the zip file are converted. So when do you think that will be a feature in Revit's eTransmit?
Mark Petrucci

December 19, 2011

eTransmit for Revit

While we haven't experimented with this yet, this may be worth checking out.  Autodesk Labs has released an update for Revit eTransmit.  Everyone gets nasty messages from a workshared Revit model when you are the one that is getting a file from a consultant. Hopefully, this makes sending (and receiving) the Revit file a bit easier - and makes sure that everyone is getting the right info.

From Autodesk:
With eTransmit for Revit, you can:
  • Copy and detach a Revit model and associated files to a single folder for internet transmission. This removes the typical error messages when you copy central files using the operating system.
  • Locate dependent files automatically and include them in the transmittal folder, helping to reduce the possibility of error. All dependent files are automatically converted to use relative paths so the dependent files can be located by the model.
  • Choose to include related dependent files such as linked Revit models, CAD files, DWF™ markups, decal images, and external keynote files. You can transmit any Revit (.rvt) model that has beenupgraded to be compatible with a 2012 Revit software product.
  • Transmit models that are using file-based worksharing or server-based worksharing. eTransmit for Revit will also work with non-workshared Revit models.
View of the eTransmit dialog.


-Pete Zyskowski

Explore Multiple Design Alternatives

AutoCAD Civil 3D enables you to explore multiple options, ultimately helping you produce an optimized design. The integration of imagery and geospatial data assists in identifying an optimal solution early in the overall process, helping to save time and money.

• Import geospatial data, such as soil types, land use information, and environmental constraints to more quickly analyze and better understand the probable impacts of different alternatives.

• Use imagery and terrain models from Google Earth™ mapping services and other sources to help visualize the ecosystem of a project.

• Most project data—such as survey information, surfaces, profiles, horizontal alignments, and
corridor models, as well as related annotations and labels—have predictable relationships with other elements in your design. This results in the dynamic updating of model elements when related elements are changed.

• AutoCAD Civil 3D includes terrain shaping tools that support large-surface models while
maintaining dynamic relationships to source data, including contours, break lines, corridor models, and grading objects.

• Use surfaces as references for creating profiles, sections, and corridors. Any changes to the source data result in automatic updates to surfaces and references, which helps you save time and reduce errors. This means that several alternatives can be evaluated quickly since immediate feedback is given, helping to ensure important design constraints are held, such as project limits staying within existing rights of
way.

Built-In Standards


Standards are the universal language of civil engineering. Almost all projects need to respect local constraints for steep slopes, pipe layout, minimum parcel size and road frontage, sight distances, road curvature, and more. Additionally, construction documents need to use the appropriate line types, line weights, and symbology to be readable for construction and accepted by regulating agencies. Designers can make changes with more confidence because AutoCAD Civil 3D 2012 software helps them to meet the design criteria mandated
by the customer and various third parties.


  • AutoCAD Civil 3D 2012 software has built-in tools that help reference and report violations of industry requirements, like AASHTO and TAC standards.
  • Corridor models can be built using assemblies with parametric constraints based on agency requirements.
  • Customize tables to help you adhere to unique standards that are enforced by local agencies.
  •  Maximize parcel yield and green space using built-in tools to help meet local standards for size, frontage, and setback. Use interactive editing tools to preview changes and refine layouts without your established constraints before deciding on a final design.
  • Autodesk Storm and Sanitary Analysis, included with Civil 3D, is based on industry-leading hydrologic models such as EPA SWMM Version 5, TR-20, TR-55, and other regional models, which facilitates submittal of stormwater management reports in many jurisdictions.

December 15, 2011

PLM for the masses, courtesy of Autodesk 360 Nexus

Every company, whether manufacturing a product, designing a building or providing a service (IT, consulting, etc.) has a concept, a plan, process or design reviews, and procedures related to the startup, production, management and pass-off or completion of their product, building or service. And all aspects of that lifecycle ideally should be documented and accessible (at various permission levels) throughout the entire organization.

Some of the traditional objections to implementing PLM have been the massive infrastructure and investment in costly programming needed to link disparate and non-communicative technologies. Try connecting Vaulted Inventor assembly data to an ERP system based on a "home grown" AS400 platform for example...it works about as well as Monty Python's Hungarian at the Tobacconist using an English phrase book. And if you don't know how that sketch ended, look it up on YouTube - not pretty!
This is where Autodesk 360 Nexus appears to have an ingenious way of clearing the hurdle mentioned above - by keeping the data inside the firewall and providing a Cloud based, zero infrastructure investment model whereby anyone collaborating or doing business with a company can view data about various stages of the lifecycle, from virtually anywhere.

When considering Autodesk’s diversification and continued gains in the markets as a software provider to the AEC, manufacturing and M&E (media and entertainment) segments, tight integration of Nexus 360 with their mature Vault and Buzzsaw product lines is a given.

So when you start hearing the term PLM, don't think that it's limited to manufacturing companies, or only Product Lifecycle Management. It is about to become whatever you need it to be...

Learn more at http://usa.autodesk.com/360-lifecycle-management-software/plm/, and sign up at the top right of the page for information as this exciting new offering from Autodesk takes shape.

Integrate Design and Analysis


Teams regularly spend time recreating various aspects of the project design in separate analysis software. Different aspects of civil designs must be
analyzed at various stages of a civil project. The designer needs a good understanding of slopes, earthwork volumes, stormwater management, and more.  Analysis results must be considered as a whole in order to make design decisions  that satisfy the project requirements. Civil 3D helps eliminate redundancy in  your workflow by analyzing the model you’ve already built. Designers can get
feedback in real time, while there is still an opportunity to refine the design
and make changes.

• Analyze pre- and post development hydrologic conditions
using integrated hydraulic and hydrology tools.

• Analyze your AutoCAD Civil 3D pipe network models, culverts, and channels using Autodesk® Storm and Sanitary Analysis 2012 software to help make design decisions. Automate the
generation of robust reports for submittal to review agencies.

• The mass haul and earthwork features enable contractors and engineers to more effectively
plan the movements, amounts, and placements of material during construction. As
designs are changed, Civil 3D can help to quickly analyze earthwork balance
points, determine the amount and direction of material to be moved, and identify
optimal locations for borrow pits and dump sites.

• Directly import customized pay item information into AutoCAD Civil 3D 2012 software for use in
assigning pay item values to objects in the drawing, including AutoCAD entities
and AutoCAD Civil 3D model elements. Automatically calculate quantities and
generate reports based on pay item values.

Kenneth Driscol

December 14, 2011

Convert MEP Object-based families to Face-based families

The great majority of manufacturers who are developing families of their respective product lines, are building the families for architects rather than engineers.  As a result, often the families developed cannot be used in a RMEP project due to the need for RMEP objects to be Face-hosted rather than ceiling-hosted, wall-hosted or floor-hosted.  In the past, engineers needed to rebuild families to use within the RMEP project.  Not any longer.  Now we can use the Copy-Monitor function to accomplish the conversion.

Below you will see where I have placed some walls to allow the mounting of the wall-hosted light families.


If I select one of the lights, take it into the Family Editor, you can see from the Properties that the host object is a Wall.

Next, I will start a RMEP project and link in the model with the wall that hosts the light fixtures.  And then use the Copy-Monitor function to Copy one of the light fixtures.


Upon completion of the Copy-Monitor function, by selecting the light fixture, you can see that it is a monitored object and resides natively in the RMEP project now.


Then when I take it into the Family Editor, you can see the host-object is now Other.  The light fixture family can be saved now to your library as a Face-based hosted object rather than a Wall-hosted object.

December 13, 2011

What's the key with keynoting?

What is sheetrock? I mean drywall? Or is it Gypsum Wall Board? Maybe GWB? No, it called Gyp Board... I think... When we detail drawings, we need to label elements and materials. We have always done this with leaders. A leader is the arrow pointing the object. However, in AutoCAD, the leader command is used to place text with the arrow connected to it. We can do the same in Revit but with the text tool; we can specify if a leader should be part of the text element.


So what is keynoting and what does it have to do with text and leaders? Keynoting is placing "smart text" with a leader pointing to an element or material. Keynoting automatically fills in the "text" for you. How does it do this?


In short, when you touch an element or material, Revit looks at it's assigned keynote number and places keynote tag it in the view. The keynote tag can display the keynote number or keynote text. Keynote text can look just like plain text with an arrow. However, you don't type anything; Revit fills in the information for you.


The keynote number and its associated text is kept in an external text file called RevitKeynotes_Imperial_2004.txt. Click on Annotate ->Tag Panel (Expanded)->Keynote Settings. You can see the path where this file is kept and the name. You can also view the file.


Many, if not all, 2D Detail Components have been configured to work with Keynote Elements. Most materials, however, are not configured to use Keynote Materials. It's not hard to do but it requires time to configure.


Once configured, any user in an office who keynotes 1/2" drywall, with a few clicks of the mouse and no typing, a leader (a keynote tag) will appear with the words " 1/2" Gypsum Wallboard ". No need to worry someone might write 1/2" G Wall B!


Watch for a follow-up blog about how to edit the keynote file and change the the text to upper case.
Mark Petrucci

December 12, 2011

Autodesk's 360 Nexus PLM solution - Changing the landscape for the SMB market


While en route to the first of 4 Innovation Forums at Autodesk University this year, there were 2 buzzwords that I knew I'd hear many times during the conference: "Cloud", and "PLM". And while the former certainly has multiple definitions, the latter has traditionally been defined as Product Lifecycle Management. However, with the launch of Autodesk 360 Nexus, PLM may soon be democratized and more accessible to SMB (small to medium sized businesses) than ever.

First, let's distinguish the differences between PDM and PLM. At it's core, PDM focuses on the data involved in the design and manufacture of a product, and therefore, is most important to those divisions of an organization. In more progressive firms, the data is shared with sales, marketing and ERP, though frequently as a non-collaborative, one way push. Many clients of ours have a PDM system courtesy of the Autodesk Vault, which is an engineering centric tool for data management.

But PDM, through Vault, DBWorks or even Windows Explorer (yikes) is merely one component of PLM, which focuses on the lifecycle of a product, from concept to retirement. With PLM, each division of a firm is a participant in the product, including
documenting its origin
  • versioning its iterations 
  • releasing the manufacturable content for build 
  • itemizing the purchased and manufactured parts for accounting 
  • creating service manuals, sales and marketing content 
  • And finally, maintaining the product once sold in the field, until ultimately being withdrawn or replaced with a newer product line.
If you're in a manufacturing company that fits the criteria above, then the traditional PLM acronym certainly applies. But given that the "L" stands for lifecycle, if we consider the functions of non-manufacturing firms in relation to my laymans definition of PLM,, then why couldn't the "P" stand for "people", "project" or even "process"?

If this concept can gain traction in non-manufacturing firms, THIS is where Autodesk may revolutionize the PLM market.

Next time - "PLM for the masses, courtesy of Autodesk"

Upper Case Keynote File

Keynote file is not all upper case. So how do you make all letter upper case? First, open RevitKeynotes_Imperial_2004.txt with Microsoft Excel. With MS Excel, you can add, remove, or modify keynote numbers and text.


While in Excel, you will need to create a new tab and link to the cells in the first tab named RevitKeynotes_Imperial_2004. To do this, click on a blank sheet; there should be one called Sheet1. Click in cell A1 and paste this line without the quotes, "=UPPER(RevitKeynotes_Imperial_2004!A1". Then drag this cell down to row 5376! Yes, that's how many rows there are in this file. Next drag and copy the entire column to the right 3 columns. Hit the save button. You will be warned that this file may contain feature that are not compatible with Text (Tab delimited). Click yes to the save the tab with upper case letter and you are finished. However, if you want an even faster way, you can download this file

Color Display of Worksharing

The “Worksharing Display Settings” is a tool to help you display a view in your model based on Worksharing status. This is a relatively unnoticed addition to Revit in 2012. The tools can be accessed in the View display tools in the bottom left corner of a view after a project has been Workshared. See Image above for example.
This tool is a way to color display some critical information about the current view related to Worksharing. There are four settings: Checkout Status, Owners, Model Updates and Worksets. The Colors can be changed for each topic for a more desirable look. See image below for example.

December 8, 2011

Project Dasher

I just ran across this while looking at some Project Vasari videos for a Green BIM presentation I'm working on.  Autodesk Research is dipping its toe into some really cool next generation BIM stuff that really ties the model (and data) to real world use. Between this and some of the  other stuff going on over there, I think we're going to see some fantastic innovation in the coming years.  Take a look at this video and then go visit Autodesk Research.  I can't wait for some of this stuff to show up in Autodesk Labs.


From Autodesk:
"Project Dasher is a web-based application that helps to augment existing Autodesk® Revit® design models with real-time building submeter and sensor data on electricity and occupancy. Using meter and sensor data, Autodesk Project Dasher aims to demonstrate the value of integrating Building Information Modeling (BIM) and building instrumentation to provide building owners more insight into how existing buildings perform in real time and throughout the lifecycle of the building."
PS - Check out the Analytic Drawing project too!  Get ready to really start having fun with 3D models.

Setting Up 3D Section Views


In an earlier post, Mike Massey described Setting Up 3D Views for Levels in your Revit project. I agree that this is a great idea and very useful for creating consistent looking isometric views of each level in your project. Views like this often convey a layout to your client more effectively than a 2D orthographic plan view.

Note: the section box uses the View Range or Far Clip Offset and Crop settings to define the section box.

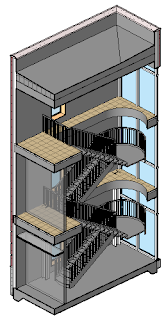
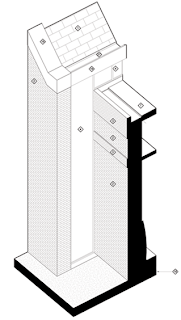
While designing in Revit we are constantly building our project virtually. This is an opportunity for adding 3D views of the design to the construction documentation. New to Revit 2012, we can lock a 3D view and add more annotation.Consider creating 3D section views from wall sections, stair sections, elevator shaft sections and other callout views, to enrich your documentation. You create these views the same way Mike describes in his post.


Steps for Creating 3D Views from other Views:

December 5, 2011

Changing Education Paradigms.

Many of you have seen this amazing video already; I stumbled over it again this morning, and its effect is as profound now as it was on the first viewing. This animate was adapted from a talk given at the RSA by Sir Ken Robinson, world-renowned education and creativity expert and recipient of the RSA's Benjamin Franklin award.

http://youtu.be/zDZFcDGpL4U


For more information on Sir Ken's work visit: http://www.sirkenrobinson.com

Creating pipe Networks from GIS Data Part 1

 This is the first post of a three post series in which I will be covering pipe networks created from GIS data. Using this feature new to 2012 you may have noticed that GIS data in the form of SHP files may not always be what you expect. Especially when you import this data and create pipe networks from it, remember - garbage in, garbage out.

If the original GIS data has the correct object data associated with it, (inverts, pipe size, materials, etc.) the better end result you are going to get. Additionally, you will need to take into consideration the amount of vertices that these pipe lines have in them. If the pipes have many vertices between actual pipe start and end, Civil 3D will place a null structure at each one of these vertices. This may be acceptable if the pipe really does end there, but edits may need to be made prior to import as well as after the fact.  If the data has excessive amounts of vertices, you can easily edit these with a few different options.

First, you have the new AutoCAD functions in which you can hover over the vertex and it gives the option to remove the vertex. This is a quick and easy option if you only have a few vertices to address. Next, is the most efficient option; use the Map Cleanup functions of the MAPCLEAN command. The Simplify Objects option will make quick work of the extra vertices. This makes quick work of entire city blocks of pipe data that hase excessive amount of unnecessary vertices. Finally, you have the option of using the WEED command, which you may recall using with feature lines, but works with polylines as well. I found this to be the least ideal option, but it is definitely worth having available in case you need it. So prior to importing your SHP data as Civil 3D pipe networks, you should review the data you have obtained to ensure that all excess vertices have been addressed to avoid the excess null structures.

December 2, 2011

To use DPR Model Slicer or not to use?

I have been experimenting with the Revit Add-in DPR_ModelSlicer (which can be downloaded for free from: http://modelslicer.dpr.com/). From DPR’s website, the description of the DPR Model Slicer:
“DPR Model Slicer is a free Revit plug-in which facilitates the creation of 3D Building sections from a Revit model. Inherently within Revit, the only way to separate a model by floor is to filter it by reference levels. Unfortunately, this often results in a product (...), where items modeled as multi-floor elements, such as walls or columns, become associated with only one floor despite occupying space on many floors. During the construction coordination process, this can be a limitation, so it is often desired to have the building model separated into individual floors. DPR Model Slicer makes this process faster. The end result is a model which is sectioned by floors.”
In other words, if you need the model to be broken up by floors,spanning elements such as walls and risers of all disciplines, need to be split at the level designations. Now this can be done manually using the Section Box feature of a 3D View and using the “Orient to View” pointing at a Floor Plan to generate the section box cut. Should the model be only one to three floors, the manual process isn’t too bad. However, if the model is multi-story, the manual process could be quite time consuming. That is when the DPR Model Slicer could be a time saver for exporting appropriately sliced up models to other CAD programs and Navisworks.  Please refer to the DPR website for directions on usage, but an example that I made is below showing the split generated in the NWC export, specifically on the pipes.


A few observations that I have may speed you along should you decide to give the DPR Model Slicer a try.

Civil 3D 2012 Service Pack 1

AutoCAD Civil 3D 2012 Update 1
In a continuing effort to provide high quality products, Autodesk has released AutoCAD Civil 3D 2012 Service Pack 1, which fixes or addresses a variety of issues discovered by customers and by Autodesk's internal testing team. This Service Pack includes all previous hotfixes for AutoCAD Civil 3D 2012. It also includes the fixes included in AutoCAD 2012 Service Pack 1 and AutoCAD Map 3D 2012 Service Pack 1. Note: This update applies to all language versions and to versions of AutoCAD Civil 3D 2012 with previous hotfixes applied. Before applying this update, make sure that any customizations made to the user profile (such as, customizations made to the support file search paths, print file customizations, printer support file paths, redirections, custom template settings, and so on) are exported to a secure location, then imported and reapplied after the update has been successfully installed. You cannot run an automatic uninstall to remove this update. To restore your version of AutoCAD Civil 3D 2012 to its pre-update state, uninstall AutoCAD Civil 3D 2012 and reinstall it. c3d2012_win32_sp1.exe (exe - 28421Kb)

December 1, 2011

Revit Structure to AutoCAD Plant 3D

Scenario: "My structural dept has designed the building and platforms for the plant design in Revit Structure. How do I get them into AutoCAD Plant 3D?"

This is common, especially since the Plant Design Suite Premium and Ultimate comes with Revit Structure. The workflow is simple. My structural model is shown below in Revit Structure 2012. I simply export that file out as a DWG.


Then go to AutoCAD Plant 3D. If you have a drawing started already, in the ribbon, go to the INSERT tab. If you do not have a drawing started, create one. In the REFERENCE section, you will click on ATTACH in order to XRef the drawing into the Plant 3D Drawing. If the coordinates and scale in the Revit Structure model are the same coordinates and scale as in your plant model, then just accept the default insertion and scale.


Your model should now include your Revit Structure design. You can use the geometry on that model for placing equipment and routing pipe just as you would if you had modeled it all with AutoCAD Plant 3D structural shapes.

Happy Routing!