 The Revit Conceptual modeler, also know as the Building Maker, is a set of tools within Revit to assist you with designing a building. Whether it is figuring out a free-form shape, or how a building will sit on a site, these tools are very useful in accomplishing those goals. Here is a 10 minute video we put together showing the Revit Conceptual modeler. After clicking play, you may want to maximize the window to see things better...
July 26, 2012
Revit Conceptual Modeler
The Revit Conceptual modeler, also know as the Building Maker, is a set of tools within Revit to assist you with designing a building. Whether it is figuring out a free-form shape, or how a building will sit on a site, these tools are very useful in accomplishing those goals. Here is a 10 minute video we put together showing the Revit Conceptual modeler. After clicking play, you may want to maximize the window to see things better...
July 25, 2012
Section Marks in Revit Disappear
Oh No, My Section Marks in Revit Have Disappeared!?

July 24, 2012
Revit 2013 Updates
Time to update your Revit environment:
Revit Architecture:
Revit Structure:
Revit MEP:
Revit Complete from the Building Design Ultimate Suite:
dennis
July 23, 2012
Revit MEP 2013 – Selection Sets
Selection Sets:
The capability to create Selection Set Filters has been a part of the Revit Structural for some time now. With the release of RMEP 2013, the building engineers now have the same capability. With this feature, a selection set of objects can have display settings applied in the Visibility Graphics just like we have done with Filters setup based on Filter Rules. Have you ever needed to turn off several objects in a view, but didn’t want to turn off all the objects of the same category? Have you ever wanted to color certain objects differently from the category? Then Selection Sets may be your answer.

In the view to the left, I have a water closet and a vanity sink unplumbed that I do not want to show.

When I select the two fixtures, on the Modify ribbon panel, you will find now, the Selection Panel which contains the feature to Create and Edit Selection Sets. (Yes, you are seeing that right, I use magenta as my selection highlight color.)

I will give my selection set a name: MySelectionSet

Next, we go to the Visibility Graphics/Add Filters and you will see that the created selection set, MySelectionSet, is available to add to the Filters of the view.

Once added, our selection set has all the filter options to turn off the visibility, control surface coloring, transparency and halftone.
Benefits:As opposed to “Hide in View”, the Selection Set can easily be made visible without digging through “Reveal Hidden Elements”. The selection set filter can be used again and again in any view. Also, in my example I worked with just the category Plumbing Fixtures, but I could have just as easily selected objects from multiple family categories.
For an overview of the new features and enhancements for Revit MEP 2013, see the link:http://usa.autodesk.com/revit/mep-engineering-software/#whats_new
July 16, 2012
Visualizing Revit MEP Spaces in 3D
I am very visually oriented. I like to see what I am modelling. However, when it comes to Spaces within RMEP, you couldn't see what you are really doing. While there is a model view of Spaces within the built-in analysis interface, I still had difficulty exploring to see where I may have missed placing Spaces or where Spaces were overlapping one another. Now, working between RMEP and Navisworks, the Space model can be visualized. Start with the settings for Revit NW Exporter and/or NW Reader:
 |
| Navisworks Option Editor for Revit File Reader |
Findings as I was exploring this feature: You do not need to check the box “Convert
room geometry” which is to convert the Spaces to construction parts. Either way, the Spaces show up. If using the NW Exporter from Revit, I still
needed to have a 3D view as the active view when I issued the command. If you have a Plan View up, example Level 1,
then I found that my Level 1 Spaces came in flat/2D while Spaces from other
floors were 3D. You do
absolutely have to Convert Entire Project.
I can see where this would help to insure all area volumes are accounted for with a Space. Look through the Space Model and find the gaps. Specifically where this helped me tremendously is in the
Revit MEP Loads Analysis. Reviewing the Spaces on the Detail tab, often
you will get a warning about overlapping Space Volumes:
 |
| RMEP Loads Analysis |
It can be difficult sometimes to find the overlapping. Revit will not display the Spaces in a 3D
view, which would help greatly to see and evaluate the Spaces overlapping, so
using Navisworks becomes an important tool for visualization of the Spaces.
Below is a screen shot of how I setup my SearchSets and
Appearance Profiler to make the Spaces easier to evaluate.
 |
| Navisworks Appearance Profiler |
From here, I first tried to run a Clash Detective batch to
find the overlapping Spaces, but discovered that the Spaces did not Clash with
one another. I even used the move to
tool and move one Space clearly into another Space and then Clashed those two
Spaces specifically, but still did not get a Result. I tried both normal Hard clash, and the new Hard(Conservative) clash (See some further notes on this below).
Then I discovered a magic setting, in the Rules tab, I clear the check mark for "Items in same group/block/cell". Very odd, but nonetheless, I got a clash result. Digging a little deeper, I found in Options/Model/Performance/On Load Collapse on Convert to be set to None. Once I set this value, I was able to check the "Items in same group/block/cell" and still get clash.
Then I discovered a magic setting, in the Rules tab, I clear the check mark for "Items in same group/block/cell". Very odd, but nonetheless, I got a clash result. Digging a little deeper, I found in Options/Model/Performance/On Load Collapse on Convert to be set to None. Once I set this value, I was able to check the "Items in same group/block/cell" and still get clash.
 |
| Selected Spaces isolated by Hide Unselected |
Now
to analyze the Spaces' overlapping.
As I rotate around, I can see the problem easily:
 |
| Slight overlap |
Head back into Revit MEP, put in a Space Separator, and my
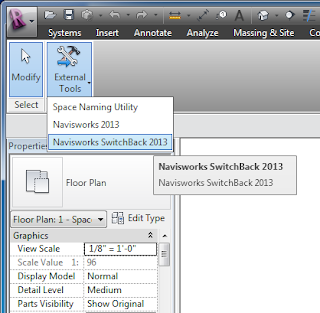
overlapping problem is gone. If you haven't tried the SwitchBack function in Navisworks, now would be a good time to try it. Note: you first have to have Revit open and Switchback turned-on:
A little more detail on the clashing: there is a new Clash Setting option called Hard(Conservative). The difference in the Hard(Conservative) and the standard Hard clashes is in how the defining triangles of an object are evaluated. The normal Hard clashes look for intersecting triangles, while the Hard(Conservative) looks for intersecting space. While this may not be the most accurate of mental pictures, think of it like this: picture clashing two pyramids. Normal Hard will only show a clash when triangle of the two pyramids intersect. Now, for Hard(Conservative) those pyramids' would be inside of a sphere (the sphere represents the pyramids' space), their three-points laying tangent on the wall of the sphere. The Hard(Conservative) then would show a clash if the spheres clash.

dennis

A little more detail on the clashing: there is a new Clash Setting option called Hard(Conservative). The difference in the Hard(Conservative) and the standard Hard clashes is in how the defining triangles of an object are evaluated. The normal Hard clashes look for intersecting triangles, while the Hard(Conservative) looks for intersecting space. While this may not be the most accurate of mental pictures, think of it like this: picture clashing two pyramids. Normal Hard will only show a clash when triangle of the two pyramids intersect. Now, for Hard(Conservative) those pyramids' would be inside of a sphere (the sphere represents the pyramids' space), their three-points laying tangent on the wall of the sphere. The Hard(Conservative) then would show a clash if the spheres clash.

dennis
July 3, 2012
Autodesk University 201

I am honored to have been selected to speak at Autodesk University for the 6th year in a row. This year I will be presenting two sessions.
- Schedules: Beyond the Basics
- If you can model it, you can schedule it. Using schedules in Autodesk® Revit software is a powerful way of viewing the information in your Building Information Modeling (BIM) projects. Most users create basic schedules and have a good understanding of how to create schedules. What most users do not know is some of the more powerful features of schedules. This class will explore some of the lesser-known aspects of creating schedules, such as creating embedded schedules, using conditional formatting in schedules, and understanding key schedules. We will also dive into shared and project parameters and how to use them in calculated formulas.
- Who Owns That - Best Practices for Coordinating All Disciplines
- Let’s face it there are many elements in our Revit models that are re-modeled by the Architect, MEP and/or Structural Engineers. Who model it initially? Who owns it? Is Copy/Monitored being used? These types of questions should always be asked. Items such as columns, girds, ceilings, lights, plumbing fixtures, structural walls, floors, and roofs are usually populated in both the architectural model and the engineers’ models. This session will discuss the proper workflows between Architects and Engineers and how to model elements that have both architectural and engineering needs. Learn how to share the information of these elements without having to duplicate the geometry. . Sometimes knowing when and how to share elements will eliminate the need to have ownership of elements. Learning to create the proper workflow and families will ensure that collaboration is being achieved on your BIM projects.
It is not too early to begin planning for this great event. Registration opens September 5, 2012.

June 25, 2012
Navisworks 2013 Service Pack 1 Available
Navisworks 2013 Service Pack 1:
Time to update your 2013 Navisworks, see the link below.
http://usa.autodesk.com/adsk/servlet/ps/dl/item?siteID=123112&id=19840757&linkID=10382102
dennis
Time to update your 2013 Navisworks, see the link below.
http://usa.autodesk.com/adsk/servlet/ps/dl/item?siteID=123112&id=19840757&linkID=10382102
dennis
Subscribe to:
Posts (Atom)