
 A recent question came up on how to add stripes to walls in Revit. One option is to use the “Face Split” and “Paint” tool located in the Modify tab Geometry panel. See image below.
Select the wall you want to split, then go to the Modify Walls tab, Geometry panel and choose the Split Face tool. Reselect the wall you want to split. Then draw the line or shapes you want to split up the surface of the wall.
Once done select the green check to finish.
 The wall is now split apart and ready for you to apply different materials to the wall. The split tool only changes the surface not all the way thru the wall, the wall is still one entity.
Now we can use the “Paint” tool. Select the paint tool , which is located below the previous tool we used. This will open a dialog box for materials.
Choose a desired finish to “Paint” the surface. You can scroll thru the preset materials or use the search at the top of the materials dialog box.

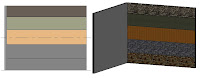
After the materials have been appled, you can view them in a shaded view, or realistic view.
If you need to remove a painted surface yo ucan do so by selecting the Paint tool, and explanding the dropdown next to it, revealing the “Remove Paint” option. Once chosen, select the portion of the wall you would like to remove the paint from.
hi. is it possible to split a curved wall.
ReplyDeleteThanks for viewing the blog. Currently only flat walls can be split. There are some features in the Massing & Site that allows to split a Massing object. It is likely that splitting a curved wall is some thing Autodesk is working on for future releases. If I hear of anything I will be sure to post it. tkx again!
ReplyDelete